
This comprehensive technical guide helps you create text boxes and borders in Microsoft Word Online. This step-by-step tutorial will equip you with the exact design mechanics needed to elevate your document layouts.
How to Put a Box Around Text in Word Online
The Core Philosophy of Document Visual Hierarchy
Before diving into the mechanical steps, it is important to understand why we isolate text inside visual containers. A wall of uninterrupted plain text causes immediate cognitive fatigue. When a reader opens a document, their eyes naturally scan for entry points, headings, and visual anchors.
Placing a border or box around a specific snippet of text achieves several design goals:
- Immediate Attention Retrieval: It flags high-priority items like safety warnings, technical notes, or legal disclaimers.
- Information Chunking: It breaks complex processes down into smaller, digestible operational steps.
- Aesthetic Professionalism: It replaces dated formatting tricks—like typing consecutive hyphens or using excessive bolding—with clean, modern structural layouts.
Methodology 1: Utilizing the Table Framework (The Universal Border Workaround)
Unlike the desktop client, which contains a dedicated “Borders and Shading” button directly inside the Paragraph settings tab, Microsoft Word Online approaches text boundaries differently. The most reliable, responsive, and customizable way to put a clean box around text in the online interface is by leveraging a single-cell table wrapper.
This approach ensures that your box stays perfectly aligned with your margins and scales beautifully, whether your reader views the document on a 4K monitor in Denver or an iPhone in Miami.
Step-by-Step Table Boxing Execution
- Position Your Cursor: Open your document in Microsoft Word Online. Place your blinking cursor at the exact location where you want your emphasized text block to appear.
- Access the Insert Tab: Navigate to the top ribbon interface and click explicitly on the Insert tab.
- Insert a 1×1 Table: Click the Table drop-down menu. Hover your mouse over the grid selection tool and select a single block, creating a 1×1 table (one column by one row).
- Populate Your Content: Type or paste your desired callout text directly inside the newly created single-cell box.
- Adjust the Cell Margins: By default, the text might sit closely against the interior borders. To adjust the spacing, click inside the table, navigate to the contextual Table Design or Layout tabs that appear on the ribbon, and use the padding or alignment tools to give your text room to breathe.
Check out the screenshots below for your reference.
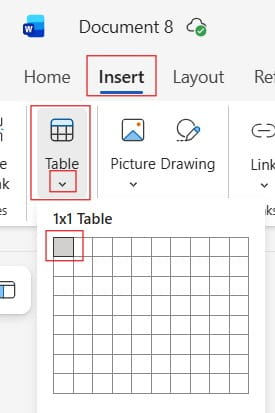
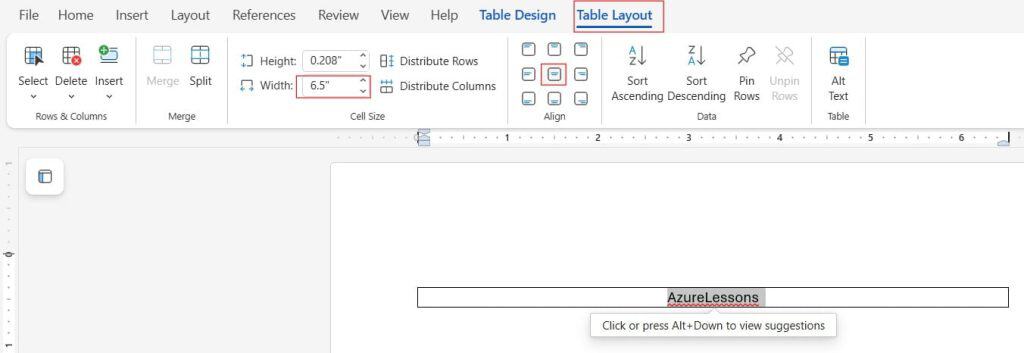
This method gives you an instant, pristine box around your text. Because it is built on a standard table element, it integrates flawlessly with Word’s core rendering engine.
Customizing the Box: Adjusting Borders, Thickness, and Colors
Accessing the Table Design Palette
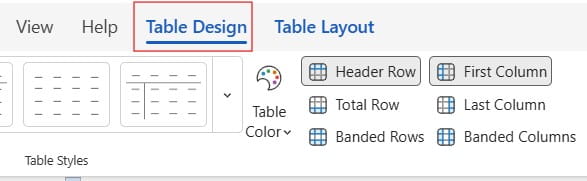
When your cursor is active inside the text box, a specialized tab named Table Design appears at the top of your screen. Click this tab to open your formatting options.
- Altering Border Styles: Click the Border Styles or border selection tool. Here, you can decide whether you want a traditional solid line, a modern dashed boundary, or a formal double-pinstripe border.
- Modifying Border Width (Weight): To make your box stand out more prominently, locate the border thickness dropdown menu. Increase the line weight from the standard 0.5-point baseline up to a bolder 1.5-point or 2.25-point thickness to create a heavy visual anchor.
- Applying Corporate Color Swatches: Click the Border Color pen tool. You can select from a standard array of web-safe palettes or input your organization’s specific hex color codes to ensure absolute brand consistency across your external documentation layouts.
Check out the screenshot below for your reference.
Methodology 2: Applying Shading and Background Accents
Sometimes, a hard border line feels too rigid for a modern layout. Combining a clean border with an interior background tint—or replacing the border entirely with a soft background highlight—is an exceptional design pattern for secondary info blocks or quick tips.
Adding Shading to Your Single-Cell Container
- Keep your cursor placed inside the single-cell table that contains your text payload.
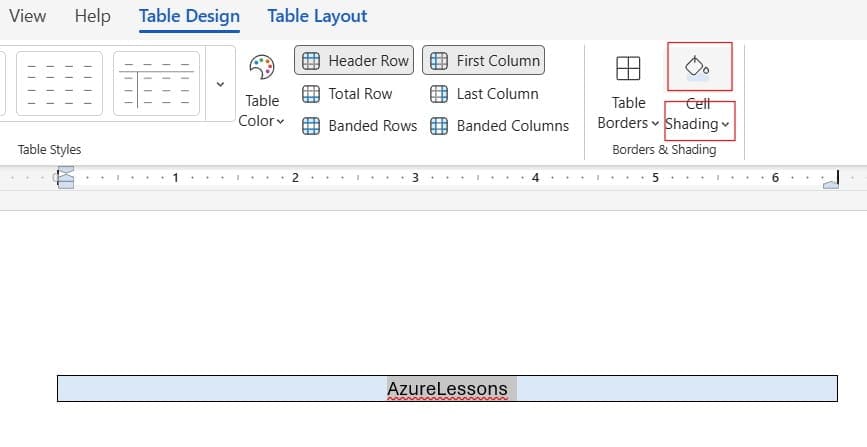
- Ensure you are on the Table Design ribbon tab.
- Locate the Shading bucket icon (the paint bucket tool).
- Click the dropdown arrow to reveal the color matrix. Select a light, muted background tint (such as a soft grey or a pastel yellow). Check out the screenshot below for your reference.
Accessibility Compliance Rule: When applying background shading behind your text, always maintain a high contrast ratio. Placing a dark text string over a dark background layer violates ADA compliance guidelines and makes your document unreadable for individuals with visual impairments. Stick to light background tints for dark text, or reverse the color scheme entirely if your corporate style guide commands it.
Methodology 3: Utilizing Paragraph Borders via Desktop App Synchronization
If you are a document purist who prefers using native paragraph attributes rather than single-cell table wrappers, you can leverage the seamless cloud synchronization between Word Online and the Word Desktop Client.
Microsoft Word Online is designed to operate in tandem with your local office applications. If you require advanced formatting parameters that are not natively exposed in the web browser layout, you can bridge the gap effortlessly without losing your cloud collaboration state.
The Hybrid Desktop-Cloud Sync Workflow
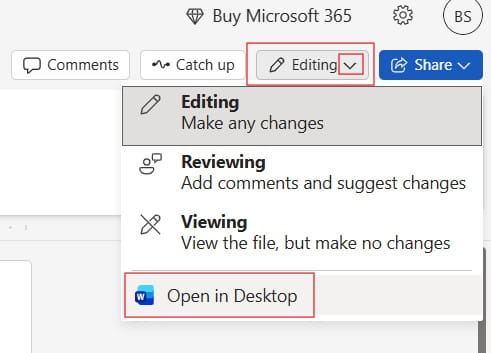
- Initiate Desktop Editing: Click the Editing button at the top right of the Word Online window, and select Open in Desktop App.
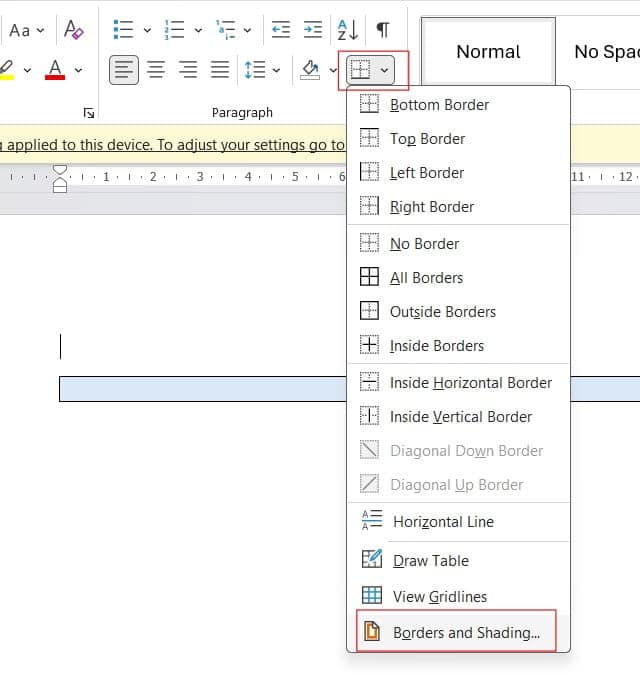
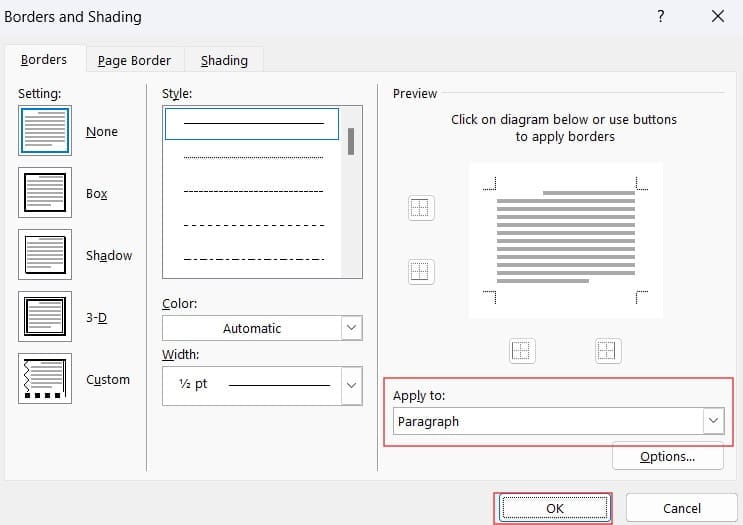
- Apply Paragraph Borders: Once the document opens locally on your machine, highlight the target text block. Navigate to the Home tab, locate the Paragraph section, click the Borders icon dropdown, and select Borders and Shading. Choose your box parameters, set the scope to “Paragraph,” and apply the changes.
- Save and Return to Browser: Save your document and close the desktop application. The Microsoft cloud fabric automatically merges the advanced structural border metadata into your online file. When you return to your browser, your text will appear beautifully boxed directly inside Word Online, fully preserved for your remote collaborators.
Check out the screenshot below for your reference.
Functional Design Guide: Choosing the Right Container Style
To help your design teams choose the right visual layout for various types of content, use this structured architectural reference matrix:
| Content Type | Recommended Box Style | Line Weight / Thickness | Best Shading Choice |
| Critical Safety Warning | Solid Red Border | 2.25 pt (Heavy) | Clean White (High Contrast) |
| Technical Pro-Tip | Single Left Border Line Only | 3.0 pt (Accent Line) | Light Blue Tint |
| System Code / Syntax | Thin Light Grey Box | 0.75 pt (Light) | Off-White / Light Grey |
| Executive Summary Quote | No Outer Borders | 0.0 pt (Hidden Borders) | Soft Pastel Yellow |
Conclusion
Putting a box around text in Microsoft Word Online is a straightforward process once you understand the underlying layout tools. By mastering the single-cell table framework, utilizing the table design palette for custom widths and branding colors, and leveraging the desktop application synchronization feature for advanced layouts, you can bypass browser interface limits and create stunning, readable documents completely in the cloud.
You may also like the following articles:
- How to Insert Text Box in Word Online?
- How to draw a line through text in Word Online?
- How to Edit Image Text in Word Online
- How to place text over an image word online
- How to move text to bottom in word online

My name is Carissa Gudino and I am an expert in word online, using Word Online in my day-to-day tasks. In this blog, I will share with you tips and tutorials on how to use word online to its fullest potential. I work for various clients in various countries like the United States, Canada, the United Kingdom, Australia, New Zealand, etc. My tutorials are designed to help beginners, as well as more experienced users, learn new tricks and tips on Microsoft word online. Check out more.