
In this comprehensive guide, I will walk you through everything you need to know about adding, managing, resolving, and troubleshooting comments in Word Online.
How to Add Comments On Word Online
Why Use Comments in Word Online Instead of Direct Edits?
Before diving into the mechanical steps, it is important to understand why leaving comments is often preferable to making direct changes:
- Separation of Review and Final Copy: Comments keep suggestions distinct from the approved text until changes are formally agreed upon.
- Accountability and Visibility: Every comment includes a timestamp and author attribution, making it easy to see who asked for what.
- Task Assignment: Word Online allows reviewers to @mention team members and turn feedback into actionable, assignable tasks.
- Preservation of Document Flow: Leaving questions in the margin avoids breaking layouts, table formatting, or paragraph styles.
Quick Reference: Methods to Insert Comments
| Method | Where to Click / Press | Best Used For |
| Ribbon (Review Tab) | Review > New Comment | Formal review workflows |
| Ribbon (Insert Tab) | Insert > New Comment | Standard document drafting |
| Context Menu | Right-click selection > New Comment | Fast, mouse-driven workflows |
| Floating Shortcut | Blue comment bubble icon next to selected text | Quick inline feedback |
| Keyboard Shortcut | Alt + Ctrl + M (Windows) or Cmd + Option + M (macOS) | Power users and heavy reviewers |
Method 1: Adding a Comment via the Review Tab
The Review tab contains Word Online’s primary editorial tools, including tracking, document comparison, and commenting.
Step 1: Highlight the Target Text
Open your document in Word Online. Use your cursor to select the specific word, sentence, or section you want to discuss.
Pro Tip: Avoid highlighting entire multi-page chapters. Highlighting concise phrases keeps the comment anchored to the exact context, making it easier for collaborators to address.
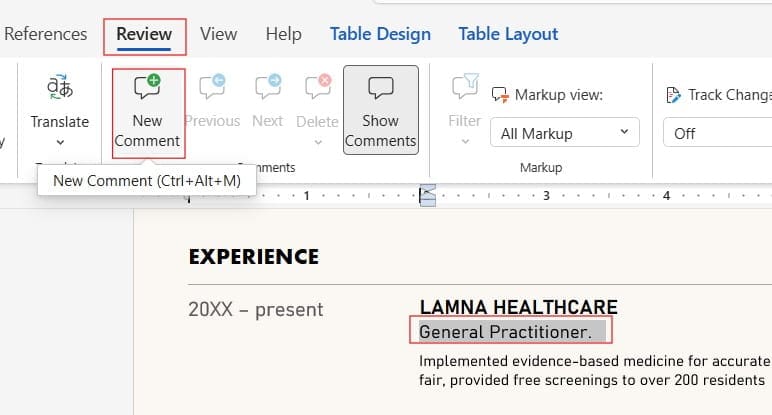
In the top ribbon, click the Review tab.
Step 3: Select “New Comment”
Locate the Comments section in the ribbon and click New Comment. Check out the screenshot below for your reference.
Step 4: Type and Post Your Feedback
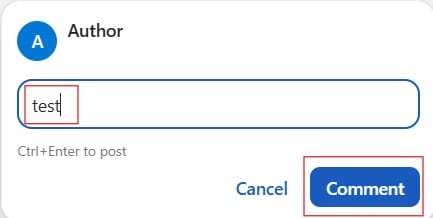
A comment card will open in the right-hand margin pane. Type your observation or question into the text box. Once finished, click the comment button (the blue paper airplane / arrow icon), or press Ctrl + Enter (Cmd + Return on macOS).
Method 2: Adding a Comment via Right-Click (Context Menu)
For reviewers who prefer minimal mouse travel, the context menu is often the fastest manual path.
- Select the text you want to annotate.
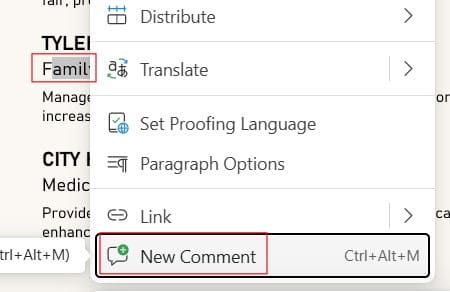
- Right-click directly on the highlighted text.
- In the pop-up context menu, click New Comment.
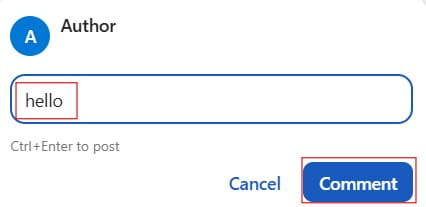
- Enter your remarks in the margin box.
- Click comment or press
Ctrl+Enter.
Method 3: Using the Floating Action Bubble
When you highlight text in modern builds of Word Online, a small contextual bubble or mini-toolbar often appears floating just above or beside your selection.
- Highlight any word or sentence.
- Look for the small Comment icon (a speech bubble with a plus sign) floating adjacent to your selection.
- Click the icon to immediately spawn a new comment entry box in the right margin.
- Type your message and hit the Post icon.
Method 4: Master the Keyboard Shortcuts
If you review multi-page reports or technical documentation daily, relying on keyboard shortcuts will significantly speed up your workflow.
- Windows: Highlight text and press
Alt+Ctrl+M. - macOS: Highlight text and press
Cmd+Option+M.
Once the shortcut is triggered, focus shifts directly into the comment card text field. Type your message, press Ctrl + Enter to commit, and continue reading without taking your hands off the keyboard.
Enhancing Comments: Mentions and Task Assignments
Word Online integrates closely with Microsoft Graph and Microsoft 365, allowing you to notify colleagues directly from within a comment thread.
How to @Mention a Team Member
- Place your cursor inside an open comment draft box.
- Type the
@symbol followed by the first few letters of your colleague’s name (e.g.,@Sarah Jenkinsor@David Miller). - Word will display a drop-down list of matching colleagues from your organization’s Azure Active Directory / Microsoft 365 directory.
- Click the appropriate name to insert the mention.
Assigning a Task
When you @mention a collaborator, Word Online provides a checkbox beneath the comment box: Assign to [Name].
- What Happens When Checked: Checking this box converts the comment from general feedback into a trackable item.
- Notification Email: The assignee receives an automated notification email containing a direct deep-link to the highlighted passage.
- Completion Tracking: Once the assignee completes the requested change, they can check off the task inside the document to mark it complete.
Managing Existing Comments: Reply, Edit, Resolve, and Delete
Collaborative editing relies on maintaining clean threads. Word Online provides four core actions for every comment thread:
1. Replying to a Thread
To keep discussions organized, never create a separate comment to answer an existing question.
- Click inside the comment card in the margin.
- Click the Reply field at the bottom of the card.
- Type your response and click Post.
2. Editing Your Comment
If you notice a typo or want to clarify your note:
- Hover over your posted comment.
- Click the three dots (…) in the upper-right corner of the comment card.
- Select Edit comment.
- Make your adjustments and click Save.
3. Resolving a Thread
When a question has been answered or an edit has been incorporated into the text:
- Click the checkmark icon (Resolve) or click the three dots (…) and choose Resolve thread.
- Resolving grays out the thread and collapses it. The anchor on the text disappears from the active view, keeping your editing canvas clean while preserving the discussion history in the Comments pane.
4. Deleting a Comment
If a comment was made in error:
- Click the three dots (…) on the comment card.
- Select Delete thread (or Delete comment if deleting a specific reply).
- Note: Deleting permanently erases the thread and cannot be undone via a simple undo command.
When reviewing extensive documents, hunting down individual comments by scrolling can become tedious. Word Online features a dedicated Comments List Pane.
Opening the Comments Pane
Click the Comments button located at the very top-right corner of the Word Online window (next to the Share button), or navigate to Review > Show Comments.
Inside this pane, you can toggle between:
- All Comments: Displays every open and resolved thread chronologically or by document position.
- Active Comments: Shows only open items that still require review or action.
- Resolved Comments: Displays closed items for auditing purposes.
Best Practices
To ensure smooth collaboration across departments, consider establishing clear internal commenting guidelines:
- Always Highlight Specific Text: Avoid placing comments at the start of an empty line or across vast sections. Precise anchors eliminate ambiguity.
- Use @Mentions Deliberately: Only @mention individuals when an action or explicit sign-off is required. Over-mentioning leads to notification fatigue.
- Resolve Instead of Deleting: Always resolve threads rather than deleting them. This preserves institutional memory and clarifies why certain editorial choices were made.
- Keep Tone Constructive and Clear: Written comments lack vocal inflection. Frame feedback around document clarity, accuracy, and style guide compliance.
Troubleshooting Common Commenting Issues
1. The “New Comment” Option is Grayed Out
- Read-Only Permissions: If you only have “View” permissions, commenting is disabled. You must request “Can review” or “Can edit” access from the document owner.
- Protected Sections: If parts of the document have restricted editing enabled via the desktop client, comments may be blocked in those ranges.
2. Comments Are Not Appearing in the Margin
- Word Online adjusts its layout depending on screen width and view modes. Ensure you are working in Editing View rather than Viewing View (toggle this using the pencil/eye icon in the ribbon).
- If your screen resolution is low, open the dedicated Comments Pane from the top right to see all items in a sidebar.
3. Mention Notifications Are Not Delivering
- Ensure you are signed in using an active enterprise or educational Microsoft 365 tenant account.
- Guest users or external personal accounts may not receive inline @mention emails depending on your organization’s tenant security and external sharing policies.
Summary
Adding comments in Word Online transforms document review from a confusing series of email attachments into a structured, centralized conversation. Whether you access the tool via the Review tab, right-click context menus, or quick keyboard shortcuts like Alt + Ctrl + M, using native comments ensures accountability, simplifies task delegation, and preserves version control.
You may also like the following articles:

My name is Carissa Gudino and I am an expert in word online, using Word Online in my day-to-day tasks. In this blog, I will share with you tips and tutorials on how to use word online to its fullest potential. I work for various clients in various countries like the United States, Canada, the United Kingdom, Australia, New Zealand, etc. My tutorials are designed to help beginners, as well as more experienced users, learn new tricks and tips on Microsoft word online. Check out more.