
In this authoritative guide, I will walk you through the simple methods to move a table in Word Online, ensuring your document layout remains professional, polished, and exactly how you envisioned it.
How To Move Table In Word Online
Method 1: The “Cut and Paste” Technique (The Gold Standard)
In my professional opinion, the Cut and Paste method is the most reliable way to move a table in Word Online. It ensures that the table’s formatting remains intact and that you don’t accidentally “nest” your table inside another paragraph.
Step-by-Step Instructions:
- Select the Entire Table: Hover your mouse over the table until you see the selection icon at the top-left, or simply click and drag your cursor from the first cell to the last.
- Cut the Table: Press
Ctrl + X(Windows) orCmd + X(Mac). Alternatively, right-click and select Cut. The table will disappear and be stored in your clipboard. - Position Your Cursor: Click in the exact paragraph or line where you want the table to reappear.
- Paste the Table: Press
Ctrl + V(Windows) orCmd + V(Mac).
Pro Tip: If the table looks slightly “off” after pasting, check the paragraph spacing above and below the insertion point. Word Online sometimes adds an extra line break that you may need to delete.
Method 2: Moving Tables via Paragraph Manipulation
Sometimes, you don’t want to “move” the table so much as you want to move the content around it. Since Word Online treats a table as a large block element tied to a specific paragraph marker, moving the surrounding text can be a faster solution.
Using Line Breaks and Backspaces:
- To move a table down: Place your cursor at the very beginning of the first cell (or just before the table) and press Enter. This pushes the table down one line at a time.
- To move a table up: Place your cursor just above the table and press Backspace. This will pull the table upward as the empty space above it is removed.
Understanding Table Alignment and Wrapping
A common reason users want to “move” a table is actually to center it or align it with a specific margin. In Word Online, this isn’t done by dragging; it’s done through the Table Ribbon.
How to Align Your Table:
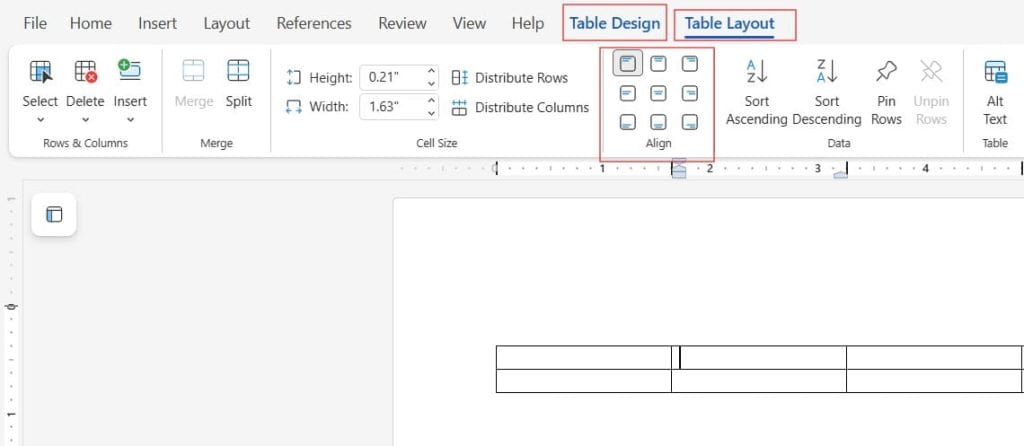
- Click anywhere inside your table to activate the Table Design and Layout tabs in the top ribbon.
- Go to the Layout tab.
- Look for the Alignment group.
- Here, you can choose to align the text within the cells, but to align the table itself, you should use the standard paragraph alignment tools (Left, Center, Right) on the Home tab while the table is selected. Check out the screenshot below for your reference.
| Alignment Type | Best Use Case | Professional Look |
| Left Aligned | Standard business reports and technical docs. | Clean, structured, and easy to read. |
| Centered | High-level summaries or decorative data. | Balanced and draws the eye. |
| Right Aligned | Marginalia or specific side-by-side notes. | Use sparingly to avoid layout clutter. |
Dealing with “Stuck” Tables: Breaking the Grid
If you find that your table refuses to move or is overlapping with other elements, it is likely due to merged cells or nested tables. Word Online can sometimes struggle to calculate the “anchor point” for a table if the structure is too complex.
Troubleshooting the “Ghost” Table:
- Check for Hidden Rows: Sometimes an empty, narrow row at the top of the table makes it appear lower than it actually is.
- Clear Formatting: If a table is behaving erratically, select it and use the “Clear Formatting” tool on the Home tab. This resets the paragraph anchors and often makes the table easier to move.
Advanced Layout: Using Tables within Tables
For those designing complex newsletters in Word Online, you might try to move a table into a specific “column” look. Since Word Online doesn’t support free-form text boxes as robustly as the desktop version, I recommend the Nested Table Approach.
- Create a 2-column, 1-row table (this acts as your “grid”).
- Move (Cut/Paste) your data table into the left or right cell of that grid.
- Set the borders of the “container” grid to “None” or “White.”
- Now, you can move the entire “container” to reposition your data table with much more control.
Best Practices
- Avoid Drag-and-Drop: While some browsers support it, drag-and-drop in Word Online is prone to “dropping” the table inside a random cell of another table. Stick to Cut and Paste.
- Use Standard Widths: Instead of dragging the edges of the table to move them, use the Table Properties to set a width (e.g., 100% or 6.5 inches) to ensure it stays centered.
- Keep Anchors Visible: Turn on your “Hidden Characters” (the paragraph symbol
¶) so you can see exactly where the table is anchored. This makes moving it significantly more intuitive.
Summary Table: Moving Methods Comparison
| Method | Speed | Precision | Risk Level |
| Cut & Paste | Fast | High | Low |
| Enter/Backspace | Slow | Moderate | Very Low |
| Table Properties | Moderate | High | Low |
| Nested Grids | Slow | Very High | Moderate |
Conclusion:
Moving a table in Word Online doesn’t have to be difficult. By understanding that the web version operates on a “flow-based” logic rather than a “coordinate-based” logic, you can manipulate your layouts with confidence.
Remember: when in doubt, Cut and Paste. It is the cleanest way to ensure your data remains intact while you reposition it for maximum impact. Whether you are drafting a simple memo or a 50-page technical manual, these techniques will ensure your Word Online documents look every bit as professional as those created on the desktop.
You may also like the following articles:
- How to convert JPG to Word Online Free
- How to make table of content in Word Online
- How to merge table cells in word online
- How to make Word Online table of contents hyperlink?

My name is Carissa Gudino and I am an expert in word online, using Word Online in my day-to-day tasks. In this blog, I will share with you tips and tutorials on how to use word online to its fullest potential. I work for various clients in various countries like the United States, Canada, the United Kingdom, Australia, New Zealand, etc. My tutorials are designed to help beginners, as well as more experienced users, learn new tricks and tips on Microsoft word online. Check out more.