
In this comprehensive guide, I will walk you through the nuances of using envelope templates in Word Online, standard US envelope dimensions, step-by-step layout tutorials, troubleshooting tips, and best practices to ensure your physical mailings always meet standards.
Word Online Envelope Template
Why Use Word Online for Envelope Formatting?
Before diving into the technical steps, it is essential to understand why formatting envelopes in a web browser offers significant operational advantages:
- Cloud Accessibility: Access your custom return address layouts and corporate templates from any computer, whether working remotely from home or in the office.
- Standardized Layouts: Pre-formatted templates eliminate manual margin calculations, ensuring address text sits safely within USPS automation readability zones.
- Cost Efficiency: Avoid expensive mailroom software subscriptions by utilizing built-in Microsoft 365 web capabilities.
- Version Control: Ensure everyone across your enterprise uses identical corporate branding, fonts, and return address placement.
Standard US Envelope Sizes and Dimensions
Choosing the correct template begins with selecting the proper envelope dimension for your mailing needs. The United States Postal Service categorizes envelopes by commercial and invitation classifications.
Here is a reference guide to the most common US envelope sizes and their standard document pairings:
| Envelope Type | Dimensions (Inches) | Common Use Cases | Standard Enclosed Document |
| #10 Commercial | 4.125″ x 9.5″ | Invoices, Business Letters, Statements | Standard 8.5″ x 11″ Paper (Folded in Thirds) |
| #9 Commercial | 3.875″ x 8.875″ | Reply Envelopes, Direct Mail | Fits inside a #10 Envelope |
| #6 3/4 Commercial | 3.625″ x 6.5″ | Personal Checks, Small Notices | Personal checks, small vouchers |
| A7 Announcement | 5.25″ x 7.25″ | Greeting Cards, Event Invitations | 5″ x 7″ Cards or folded sheets |
| A2 Announcement | 4.375″ x 5.75″ | RSVP Cards, Thank You Notes | 4.25″ x 5.5″ Cards or quarter-folded sheets |
| #10 Windows | 4.125″ x 9.5″ | Utility Bills, Tax Documents | Documents with pre-aligned window addresses |
Step-by-Step Tutorial: Setting Up Your Envelope Template in Word Online
Follow this tutorial to create, format, and customize your envelope template using Word for the Web.
Step 1: Accessing Microsoft 365 and Selecting a Base Template
- Open your web browser and log in to Microsoft 365 (
office.com). - Launch Word for the Web.
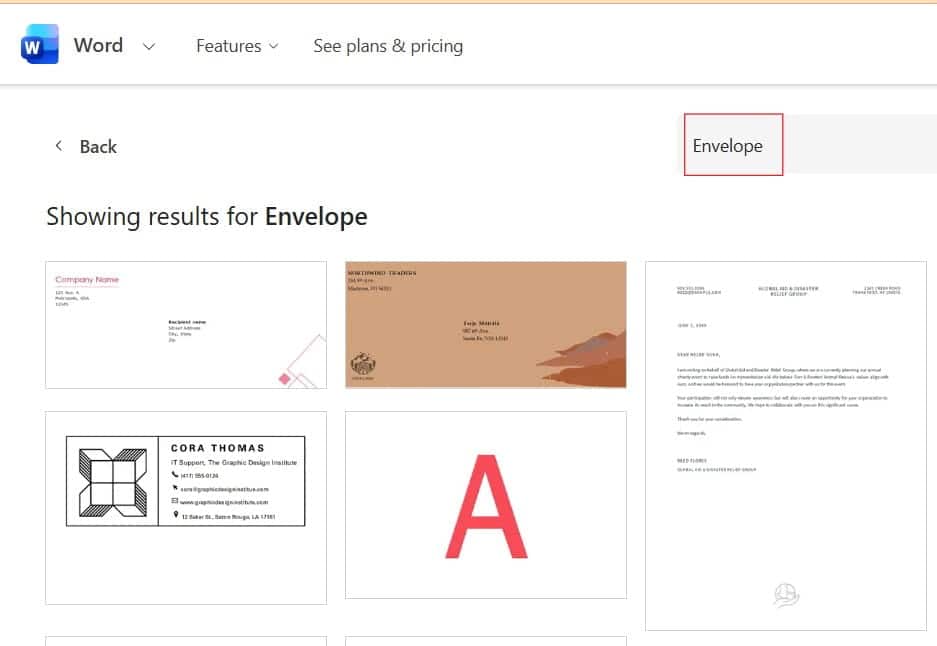
- In the template gallery, search for “Envelope” in the search bar.
- Select a template that matches your mailing style (e.g., Business Envelope, Personal Envelope, or Standard #10 Envelope).
- Click Create to open the template in your browser.
Step 2: Customizing the Return Address Section
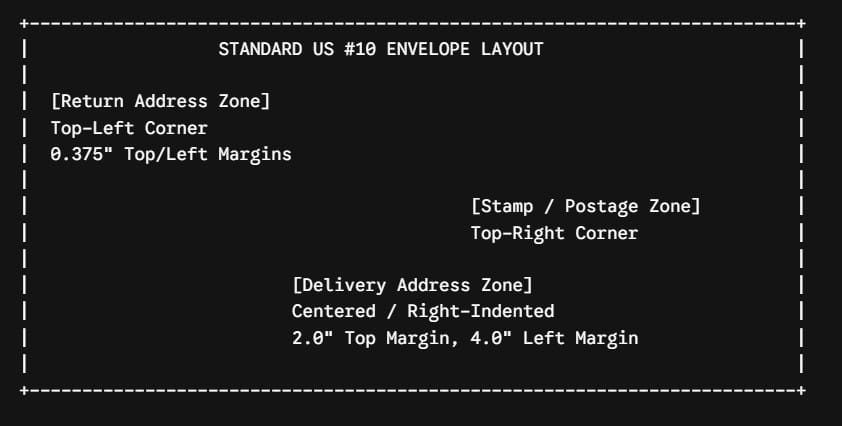
The return address belongs in the top-left corner of the envelope, adhering to standard clearance guidelines.
- Click into the Return Address text placeholder in the upper-left area of the document.
- Enter your company or personal details using standard capitalization:
Plaintext
Acme Business Solutions
Attn: Accounts Payable
123 Enterprise Parkway, Suite 400
Chicago, IL 60601- Format the Font: Highlight the text and adjust the font settings:
- Font Style: Choose a clean, highly legible font such as Arial, Calibri, or Segoe UI.
- Font Size: Set between 9 pt and 10.5 pt.
- Color: Keep text solid black or dark neutral tones to ensure postal readability.
Step 3: Formatting the Recipient Address (Delivery Zone)
The delivery address block must reside in the central optical zone of the envelope to allow optical character readers (OCRs) used by the USPS to scan the barcode and destination details effortlessly.
- Click into the Delivery Address frame located near the center-right section of the template.
- Type the recipient details following standard USPS formatting:
Plaintext
JOHNATHAN MILLER
GLOBAL LOGISTICS INC
456 INNOVATION WAY BLDG 2
AUSTIN TX 78701-4321- Apply USPS Address Standardization Rules:
- Capitalization: Use ALL CAPS for maximum automated scanning efficiency.
- Punctuation: Omit commas and periods in the delivery address block (e.g., use
STEinstead ofSuite,andTXinstead ofTexas.). - Font Size: Set between 11 pt and 12 pt for clear visibility.
- Line Spacing: Keep line spacing tight (1.0 or 1.15 line height) with zero paragraph spacing after lines.
Step 4: Adjusting Page Margins and Table Structures
Most professional Word Online envelope templates utilize borderless table frames or text containers to hold address information securely.
- Switch your view to Header/Footer & Margin Guides or select Page Layout View in Word Online to verify boundaries.
- Confirm margin settings under the Layout tab:
- Top Margin: Minimum
0.375 inchesfor Return Address;2.0 inchesfor Delivery Address. - Left Margin: Minimum
0.375 inchesfor Return Address;4.0 inchesfor Delivery Address.
- Top Margin: Minimum
- If using a borderless table layout:
- Click on the table handle to highlight the frame.
- Ensure Table Borders are set to
No Borderso frame lines do not print on your physical envelope.
Complete USPS Postal Guidelines for Envelope Design
To prevent returned mail, delivery delays, or manual sorting surcharges, your Word Online envelope design must align with official USPS guidelines.
Critical Clearance Requirements:
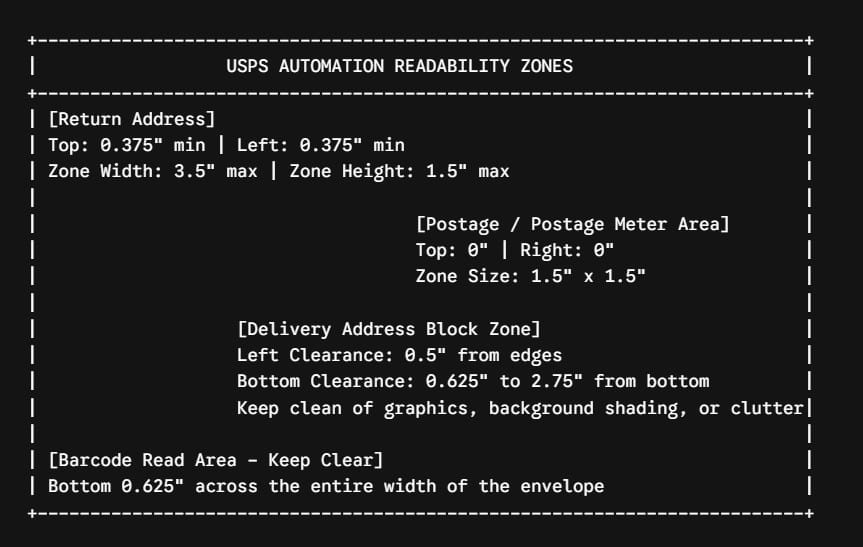
- The Barcode Clear Zone: Keep the bottom 0.625 inches (5/8″) of the envelope completely clear of logos, text, or background graphics. USPS sorting machines print a barcode in this zone.
- Return Address Clearance: Position the return address within the top 1.5 inches and left 3.5 inches of the envelope.
- Postage Area Clearance: Maintain a 1.5″ x 1.5″ clear zone in the top-right corner for physical stamps or postage meter prints.
- Contrast: Ensure high contrast between text and envelope paper (black ink on white or pastel paper works best). Avoid dark-colored envelopes for automated business mailings.
Best Practices for Corporate Branding on Envelopes
Including your company logo on a Word Online envelope template raises brand recognition before the recipient even opens the letter. However, design elements must be added carefully to maintain professional presentation and postal compliance.
Adding Corporate Logos Safely:
- Placement: Insert your company logo in the top-left corner, positioned either directly to the left of or immediately above your return address text.
- Sizing: Keep logo height under 0.75 inches and width under 1.5 inches.
- Image Formatting:
- Use high-resolution PNG files with transparent backgrounds.
- Set wrapping style to In Line with Text or Tight within Word Online to keep the image anchored to your return address frame.
- Color Choices: Stick to official brand colors, but avoid metallic or highly reflective inks that confuse postal optical scanners.
Frequently Asked Questions (FAQ)
Can I run a Mail Merge for envelopes directly inside Word Online?
Word Online does not currently support running native Mail Merge workflows directly within the web browser interface. To complete a bulk mail merge using an Excel subscriber list, click the “Open in Desktop App” button at the top of Word Online to launch the full desktop client and run your merge seamlessly.
How do I save my customized envelope template in Word Online for future use?
Once you have configured your logo, return address, margins, and font styles in Word Online, save the file to your business OneDrive or SharePoint document library under a clear title like Corporate_#10_Envelope_Template.docx. Whenever you need to print a new envelope, open that file, click File > Save a Copy, enter the new recipient details, and print.
Why does my printed envelope display error lines around address boxes?
If you see visible gridlines on your printed physical envelope, your template uses a table structure with visible border lines turned on. Select the table frame, navigate to the Table Design tab in Word Online, click Borders, and select No Border.
Can I print return addresses on envelope flaps using Word Online?
Yes, but it requires creating a custom page layout template where the return address block is rotated or positioned in a top-centered frame with appropriate top margin offsets matching your envelope’s flap height.
You may also like the following articles:

My name is Carissa Gudino and I am an expert in word online, using Word Online in my day-to-day tasks. In this blog, I will share with you tips and tutorials on how to use word online to its fullest potential. I work for various clients in various countries like the United States, Canada, the United Kingdom, Australia, New Zealand, etc. My tutorials are designed to help beginners, as well as more experienced users, learn new tricks and tips on Microsoft word online. Check out more.