
In this comprehensive article, I will walk you through designing, customizing, and deploying a flawless Word Online invoice template. We will break down structural anatomy, formatting constraints peculiar to cloud rendering, step-by-step layout design using tables, and standard metadata tracking.
Word Online Invoice Template
Why Choose Word Online for Invoice Templates?
When managing a modern enterprise, agility and accessibility are paramount. While Microsoft Word’s desktop application boasts an unmatched suite of typographical and layout tools, Word Online offers distinct structural advantages for dynamic, fast-paced teams collaborating across multiple offices.
- Real-Time Cloud Synchronization: Every keystroke is saved automatically to OneDrive for Business or SharePoint Online, eliminating the risk of lost billing data due to a sudden device failure.
- Seamless Cross-Platform Collaboration: Your account managers in Boston can populate line items in the exact same document where your project managers in Chicago are verifying billable project hours.
- Strict Version History Control: If an automated billing script or an editor accidentally overwrites a past corporate invoice template, you can roll back to a pristine state with a single click.
- Universal Access: You can review, edit, and shoot off a polished billing statement to a client directly from a web browser on any machine without needing a heavy local office installation.
The Essential Anatomy of a Compliant Corporate Invoice
Before we look at the formatting controls inside Word Online, we must establish the essential data fields required for an invoice to look authoritative, professional, and compliant with standard accounting practices in the United States.
Missing critical metadata can delay your accounts receivable process, trigger compliance issues, or look unprofessional to major corporate purchasing departments.
An enterprise-ready invoice template requires five distinct structural zones:
1. The Header and Branding Zone
- Company Logo: A high-resolution, cleanly scaled graphic representing your brand.
- Legal Company Name: Your fully registered business entity name.
- Contact Information: Physical corporate address, phone number, and a dedicated billing email address (e.g.,
billing@yourfirm.com).
2. Strategic Metadata Zone
- Invoice Number: A unique, sequential tracking string (e.g.,
INV-2026-0042). - Invoice Date: The exact calendar day the billing statement is finalized and issued.
- Payment Due Date: Dictated by your contractual credit terms (such as Net 30 or Net 60).
3. Party Identification Zone
- Bill To: The full legal company name, point of contact, and billing address of your client.
- Ship To / Project Context (Optional): The specific location, department, or internal corporate project code where the services were rendered.
4. Itemized Financial Matrix
- Line-Item Breakdown: A clear tabular structure separating services or materials into organized rows.
- Columns: Explicit indicators detailing Description, Hours/Quantity, Unit Rate, and Total Line Cost.
- Financial Totals: Separate calculations for Subtotal, applicable state taxes, discounts, and the absolute Grand Total Due.
- Payment Terms & Instructions: Clear guidance on how to pay (e.g., ACH/Wire transfer parameters, check mailing address, or online payment merchant links).
Word Online Layout Architecture: Designing with Tables
A common mistake when building a document layout in Word Online is relying heavily on repetitive spaces, tabs, or bare line breaks to position text blocks side-by-side. Because web browsers render layouts dynamically based on your screen zoom and system fonts, text positioned with tabs will shift, causing your polished layout to break when exported or viewed by a client.
To build an unbreakable template in the cloud, you must use Tables as your structural scaffolding. By building a grid and selectively turning off borders, you lock your branding, metadata, and financial line items into a rigid, beautifully aligned matrix.
The Structural Layout Plan
| Template Zone | Structural Layout Strategy | Visible Borders? |
| Top Header & Metadata | 2-Column, 1-Row Table | No (Hidden borders for clean alignment) |
| Client Details (Bill To) | 1-Column, 2-Row Table | No |
| Financial Ledger | Multi-Column, Multi-Row Table | Yes (Clean, minimalist horizontal gridlines) |
| Summary & Totals | 2-Column, Multi-Row Table | No (Align values strictly to the right) |
Step-by-Step Tutorial: Building the Invoice Template
Let us log into the cloud and build a highly scannable, visually striking invoice template completely from scratch using the Word for the Web interface.
Step 1: Initialize a Pristine Web Document
- Navigate to your Microsoft 365 dashboard (
office.com) and log in using your corporate credentials. - Click the Word application icon on the left navigation bar.
- Select New blank document.
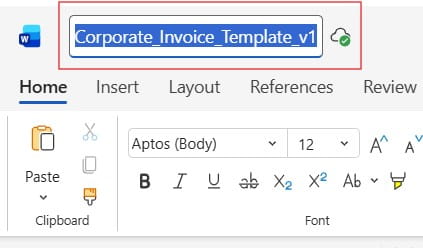
- Click on the document title at the top header bar and rename it to something structural, such as
Corporate_Invoice_Template_v1.
Check out the screenshot below for your reference.
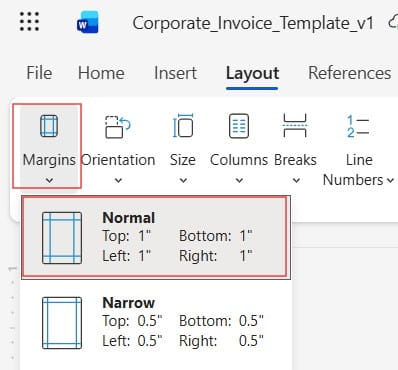
Step 2: Establish Page Boundaries
Before inserting tables, ensure your margins match standard US corporate documentation layouts.
- Click on the Layout tab on the top ribbon interface.
- Select Margins and choose Normal (which enforces a clean, 1-inch boundary on all four sides of your canvas). Check out the screenshot below for your reference.
Step 3: Architect the Top Header Grid
We want your company name on the left and the critical document metadata (Invoice Number, Date) aligned perfectly to the right edge.
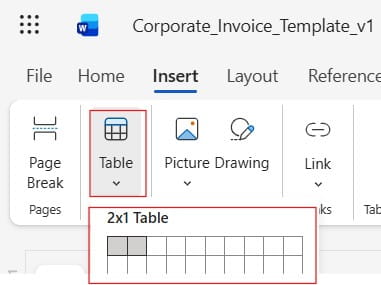
- Navigate to the Insert tab on the ribbon and click Table.
- Draw a grid that is 2 columns wide and 1 row high (
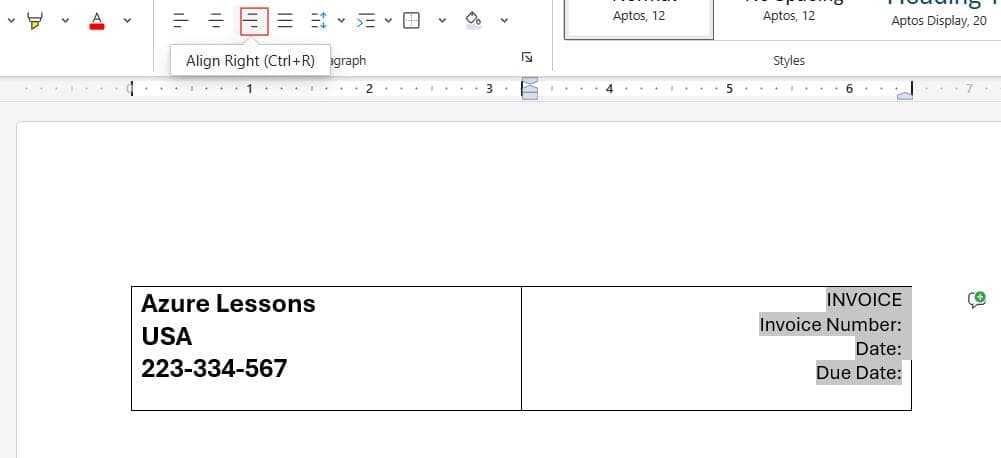
2x1). - In the left-hand cell, type your company name, corporate address, and contact details. Set your company name to Bold and scale the font size up to 16 points for typographic hierarchy.
- In the right-hand cell, type the terms “INVOICE”, “Invoice Number:”, “Date:”, and “Due Date:”. Change the text alignment of this cell to Align Right via the Home tab.
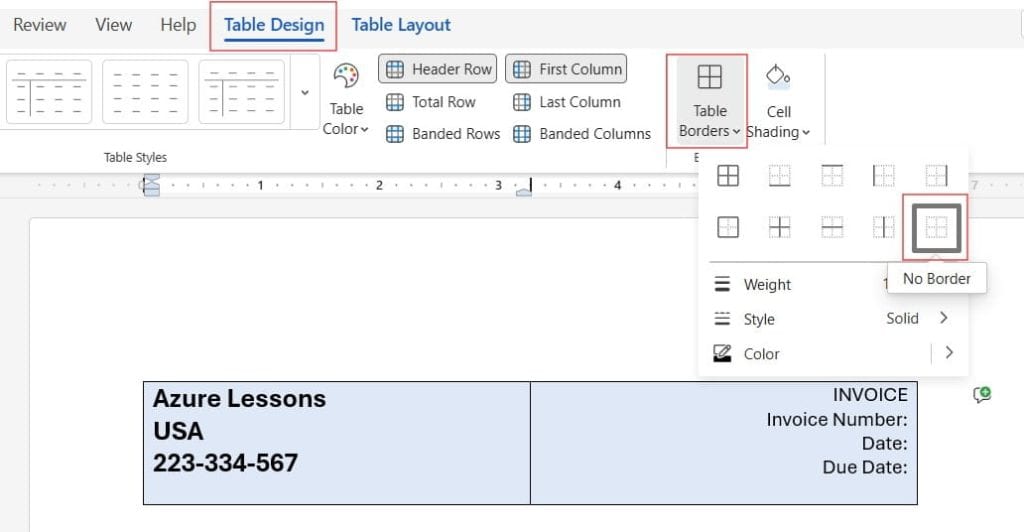
- Highlight the entire table, navigate to the Table Design tab that appears on the ribbon, click Borders, and select No Border. The text stays perfectly separated, but the gridlines disappear.
Check out the screenshot below for your reference.
Step 4: Insert the “Bill To” Space
- Press Enter twice beneath your header table to create a comfortable vertical buffer.
- Type BILL TO in all capital letters, applying a bold formatting style and a subtle accent color (like a dark slate grey) to distinguish it as a section header.
- Type the client’s name, corporate office location, and primary billing contact person on separate lines directly beneath.
Step 5: Engineer the Financial Itemization Table
This is where your clients will parse exactly what they are paying for. We need a table that can clearly handle itemized consulting hours or materials.
- Go to Insert > Table and create a grid that is 4 columns wide and 4 rows high (
4x4). - Populate the top row with your column headers:
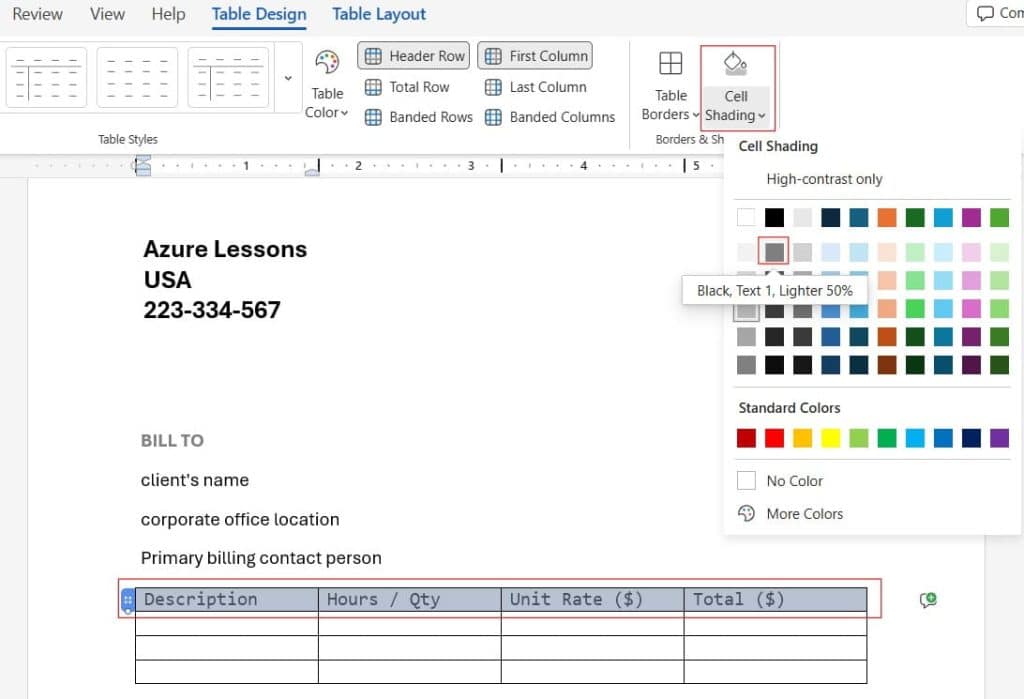
Description,Hours / Qty,Unit Rate ($), andTotal ($). - Highlight this header row, navigate to the Table Design tab, and apply a light shading fill to differentiate the header from the data entry rows below.
- Enter standard boilerplate placeholders in the rows underneath to serve as guidance for whoever fills out the document later.
- Align the numeric columns (
Hours / Qty,Unit Rate,Total) to the Right, while leaving the text-heavyDescriptioncolumn aligned to the Left for optimal readability.
Step 6: Create the Totals Area
- Move your cursor beneath the financial itemization table.
- Insert a final 2-column, 3-row table (
2x3) to handle your calculations. - Align this table to the right-hand side of your document canvas.
- Label the rows sequentially:
Subtotal:,Tax / Adjustments:, andGrand Total Due:. Bold the entire Grand Total line to draw the client’s eye immediately to the final financial obligation. Now the invoice template is ready. Check out the screenshot below for your reference.

Word Online Constraints to Keep in Mind
- Limited Font Ecosystems: Word Online utilizes a curated set of cloud-safe system fonts (such as Segoe UI, Calibri, Arial, and Aptos). Avoid installing exotic, custom corporate brand fonts on your local machine and expecting them to render beautifully inside a web browser; stick to universally supported cloud typography.
- Header and Footer Image Scaling: Inserting high-resolution images directly inside page headers can occasionally lead to erratic cropping issues inside web viewers. For an invoice template, it is far more reliable to place your logo inside the body of a borderless table layout as described in Step 3.
- Form Field Controls: Advanced XML developer form content controls (like interactive drop-down menus or date pickers) cannot be authored natively from the web interface. Keep your online templates clean and reliant on straightforward text placeholders that are easily editable via standard keyboard entry.
Best Practices for Enterprise Template Governance
1. Store the Template in a Central Asset Library
Upload your finalized template to a read-only directory inside your company’s Microsoft SharePoint document center or a shared Microsoft 365 Team channel. This ensures everyone leverages the same master file.
2. Lock Down the Core Layout
To protect the underlying table scaffolding from accidental structural erasure, utilize the desktop application to apply basic editing restrictions (e.g., restricting editing to filling in forms or locking paragraph styles) before publishing the document to your team’s online workspace.
3. Always Export to PDF Before Distribution
Never email a live .docx file directly to an external client. A raw text file can easily be manipulated, edited, or display layout warnings depending on the recipient’s personal text editor settings. Instead, utilize the native cloud printing engine:
File > Save As > Download as PDF
This bakes your tables, fonts, and numeric grids into an unalterable, perfectly formatted digital snapshot that looks identical on laptops, tablets, or smartphones.
Conclusion
Taking the time to build a robust, visually balanced, and cloud-native Word Online invoice template is an investment that pays immediate dividends in administrative efficiency. By stepping away from fragile, tab-spaced layouts and embracing the structured certainty of borderless tables, you create a resilient document asset that protects your brand’s professional authority.
You may also like the following articles:
- How to create a template in Word online
- Convert Text to Table Word Online
- How to Put a Box Around Text in Word Online
- How to Open Word Online in Desktop App

My name is Carissa Gudino and I am an expert in word online, using Word Online in my day-to-day tasks. In this blog, I will share with you tips and tutorials on how to use word online to its fullest potential. I work for various clients in various countries like the United States, Canada, the United Kingdom, Australia, New Zealand, etc. My tutorials are designed to help beginners, as well as more experienced users, learn new tricks and tips on Microsoft word online. Check out more.